
NBC 7’s Greg Bledsoe and Marianne Kushi show some alternatives they will be using to view Monday’s eclipse.
If you have not found solar eclipse glasses at this point, you are probably out of luck because there was a scramble to get them. However, you can make your own projector to safely view the solar eclipse.
NASA says pinhole projectors and other projection techniques are a safe, indirect viewing technique for observing an image of the sun.
Do not look directly at the eclipse or use binoculars or a telescope as those can seriously damage your eyesight.
The Stanford Solar Center offers tips on pinhole projections.
You'll need:
- Two sheets of stiff white paper
- A pin
Instructions:
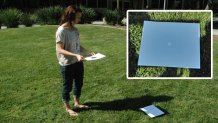
- Using the pin, punch a small hole in the center of one of your pieces of paper.
- Go outside. With your back to the sun, hold the paper up and aim the hole at the sun. (Don't look at the Sun either through the hole or in any other way!)
- Find the image of the sun coming through the hole.
- Move your other piece of paper back and forth until the image looks best. What you are seeing is not just a dot of light coming through the hole, but an actual image of the sun.
See these instructions from the NASA Jet Propulsion Laboratory.
If you want to make a cereal box viewer like the one Marianne Kushi had on this morning's newscast, here are the instructions from NASA.
Local


Materials:
A Cereal Box
Piece of heavy-duty foil
Piece of white cardboard cut to fit in the bottom of the cereal box
(for easier viewing)
Paper to cover the cereal box
Markers/Pictures used for the design of the box
Scissors
Tape or glue
Procedure:
Empty your cereal box including the inner paper that held the cereal.
Cut a white piece of cardboard that will fit snuggly in the bottom of the box, or secure it permanently by gluing it in
place.
Cut the top of the cereal box, removing both ends and leaving the center intact.
Put a piece of tape across the center of the top to securely hold it closed.
Tape a piece of heavy-duty foil or double a single layer for additional strength, covering one of the openings at the top of the cereal box.
The other opening will remain open for viewing.
Using a small nail (approximately 3mm in diameter) push a hole in the foil.
The actual size is not a critical issue; you can experiment with different sizes and shapes.